I make books, many of them out of cloth. Making a needle book is something that had never occurred to me before last weekend. This is the result: a 7×4.5×1.75″ vintage-inspired fabric needle book.
Needle books are a popular trend among the craft and home-sewing crowd. Here’s a good tutorial for one that did inspire me.
When dealing with creative folks who actually use their stockpiles of ‘clutter’, the Marie Kondo tidying craze has to take a decidedly different form. We use our stuff, or plan to. Sometimes years or decades after acquisition. Getting rid of it is stupid and counterproductive. That said, organizing is necessary, especially if our craft obsessions become paying work.
I’ve been sewing since 1983. That translates into a lot of sewing supplies, including needles. I destroy many needles during the course of some projects, but I’m always collecting more on sale or via thrift stores. I’m entering a new phase of life where tidying my gear is going to mean saving time over the long run. Rather than have two loose bins and several ragged cotton fabric swatches stuck with a thousand or so needles, I decided to consolidate most of them into a single needle book.
First stop: Etsy, to see what other people have done with the gently-quaint vintage idea of needle books. Too many of the books are made of felt. I don’t like polyester felt for this, since it can break down and loosen after a few years. Handmade wool felt, maybe. Too many needle books are set up nicely enough with raised bands to hold needles…but just one band isn’t enough to secure most needles. Too many of them only hold a few needles: pointless!
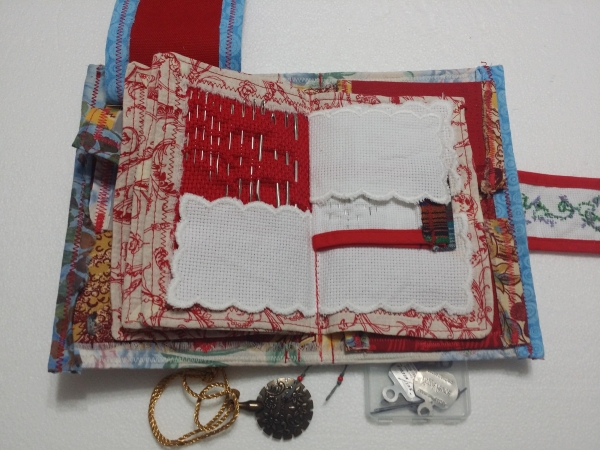
Then I looked at my own fabric stockpiles, and saw the Aida cloth I’ve gathered for counted cross-stitch ideas (mostly thrift store finds, because this stuff can be pricey!) 14-count Aida cloth has gridded holes perfect for larger needles, and 18-count cloth is good for medium to small needles. I also have a bunch of pre-made Aida cloth bookmarks (again, thrift store) that already have pretty edges.
Bright red canvas was left over from the ‘Truth Remains’ project, and various chintz, batik, and other cottons from other gigs. Thanks to an art warehouse job in the early 2000s, there’s lots of translucent, fiendishly strong nylon silkscreen fabric. Velcro? Check. Thread? Check. Waterbased glue to baste on the seam bindings? Check.

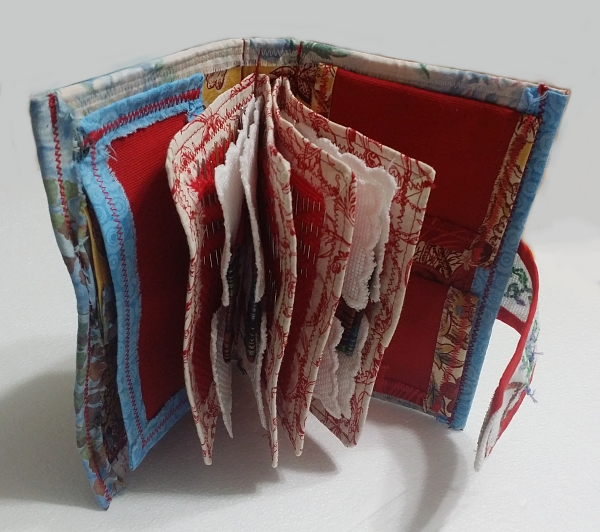
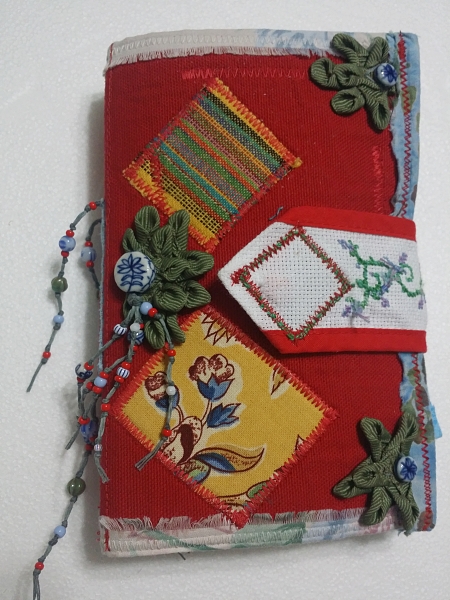
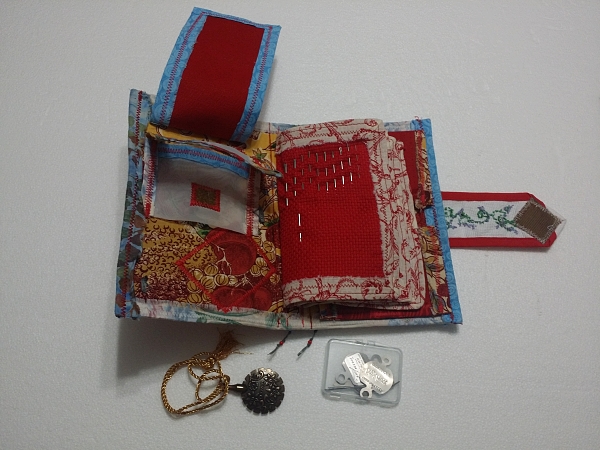
I made my covers first, from a layer of stiff felt sandwiched between red canvas and a yellow/red botanical chintz. The edgings are in blue cotton, with my favorite frayed and sewn edging that adds texture without bulk.
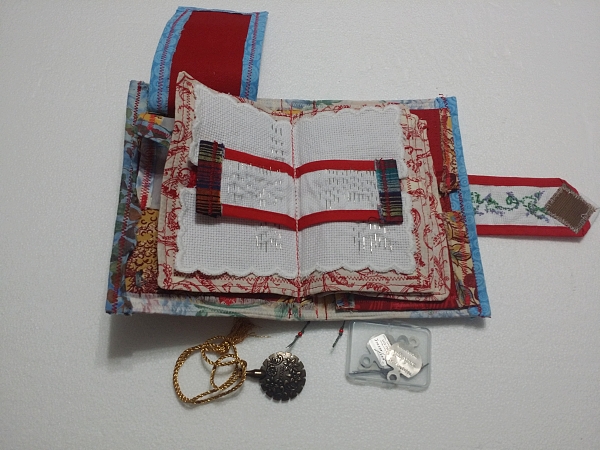
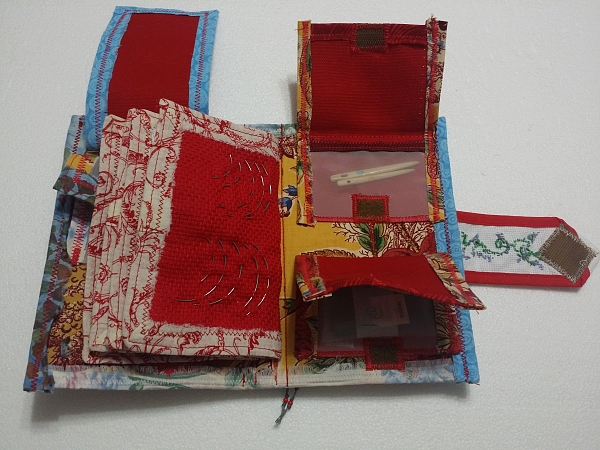
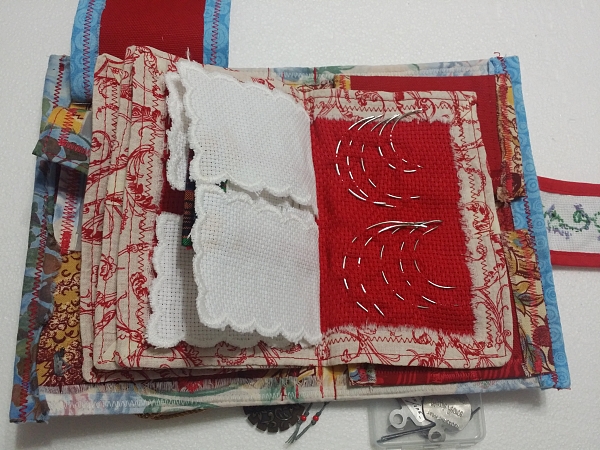
Two signatures consist of red 14-count Aida edged in red and cream cotton, with different-sized fabric bookmarks laid in as layered pages. Each signature is sewn down the middle, yielding 8 pages. The signatures were then sewn into the spine, with enough space between them to allow for the bulk of the needles. The rest of one red-edged bookmark became a velcro closure.
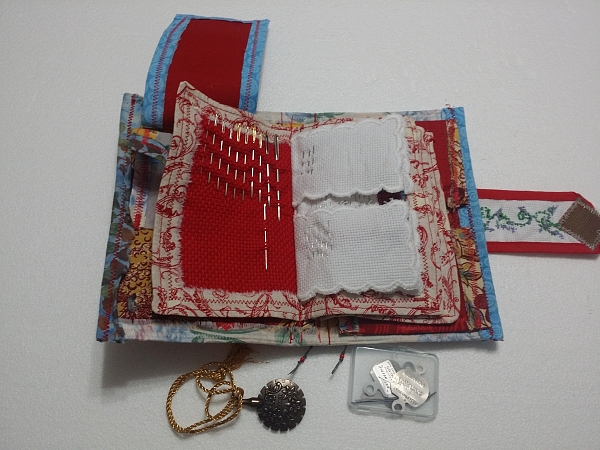
I added silkscreen fabric pockets inside each cover to hold my thread cutter, needle threaders, 600 grit sandpaper to hone needles, a plastic mini case for beeswax, and two ‘mascot’ needles I made of carved mammoth ivory.
To decorate the cover I sewed on some patches, handmade ribbon leaves salvaged from a 1997 shirt project, porcelain beads purchased in 2004, and my usual beaded tassel accents. A blue and red cross-stitch label on the spine announces ‘Needles’ for the unwary. I left room inside the front cover for a colophon label announcing my name, date, and materials.
Last stage was washing out the waterbased glues with a cold soak and gentle soap, *thoroughly drying* the book, then sticking in needles.
I would love to have this cheerful book as an asset into my eventual fantasy art studio, but I’ll settle for organizing my current chaos. Not bad for a first effort.
I’d make nicer versions for other people, but probably not to sell…since I’d have to charge at least $75 for materials, time, and labor.